Jump to content

TRC Timberworks

Archive for August, 2011

  • 21 August 2011

    The Wa of Hand Tools

    Timber Bed - Headboard

    “The Japanese word wa is a single kanji meaning ‘harmony; peace; peaceful.’ In common usage wa means ‘harmony’ as in being in harmony with one’s environment and it means “peaceful” as in being in a peaceful state of mind or feeling at peace.” ~Eri Takase

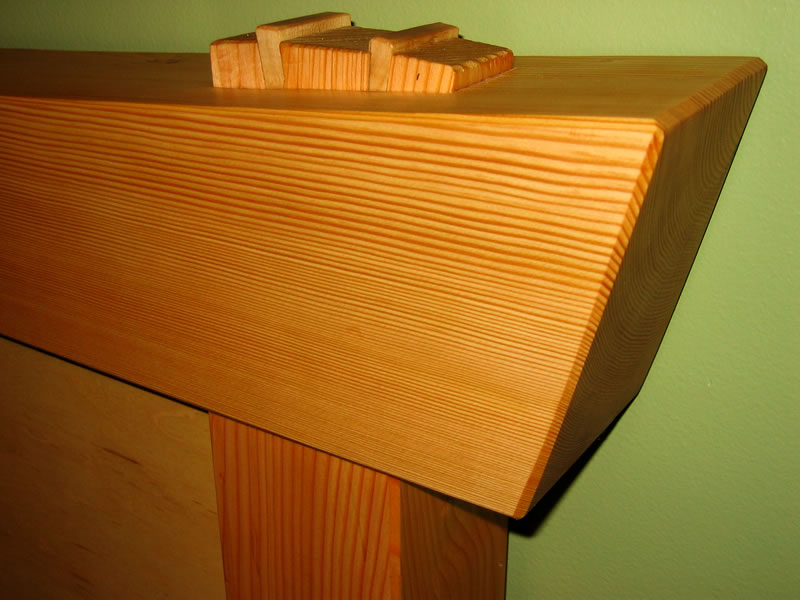
    People keep asking me why would I use hand tools to cut this timber bed? It takes longer, involves more physical endurance, and the amount of precision necessary is astonishing.

    My simple answer is the Japanese feeling of wa, or harmony, that I feel while working with hand tools. Noisy vibrating power tools don’t allow that feeling of peace to pervade my workspace or my body.

    With hand tools, I can feel the grain of the wood so clearly, and my minute adjustments as I work with the wood become a flow and a rhythm that I find hard to describe. Using the small block hand plane, I can feel even the smallest variations in the wood, and learning to harmonize with that piece of wood in order to coax out the best finish draws my attention so fully that it becomes a meditation.

    I also wanted to use woods for this bed that would give a gentle contrast in colour and grain. Maple and fir were my choices in the end, as they are both Canadian grown, and when combined in the same piece of furniture, they are different enough to provide interest while being complementary in tone.

    Douglas fir for the timbers and rails of the bed frame was a great choice for durability as well as for its reddish glow that deepens over time. This wood was harvested locally, reducing the carbon footprint (less gas to truck the wood here!)

    This bed was destined for Alberta with its arid climate, so I adjusted my joinery to take that into account. Wood is a living substance, and even after it has been harvested, it continues to change and move in tune to the rhythm of the seasons and the humidity in the air.

    ~Tim

    Share
  • 18 August 2011

    Japanese Wedged Through Tenon

    Timber Bed - Japanese Wedged Tenon

    I really enjoyed this bed project, as I was able to take some of the aspects of Japanese timber joinery and adapt them to the smaller scale bed frame. Since training with Dale Brotherton, I’ve fallen in love with Japanese timber architecture, so it was a pleasure to craft a bed with this style as the inspiration.

    The wedged through tenon shown here is part of the headboard of the bed. The “posts” of the headboard have tenons at the top that slot all the way through the mortises of the “beams”. The tenons are held in place by wedges of wood that are pounded down into shallow lengthwise cuts in the tenon, thereby widening the end of the tenon so that it can no longer slip back out of the mortise. These create some stunning focal points on the bed frame and give the observer a hint as to the details of how the bed was crafted.

    If you want to see more of how I hand cut this bed with human-powered tools, read my earlier “Furniture” blogs!

    ~Tim

    Share
  • 15 August 2011

    Radiant Floor Heating

    Radiant Floor Heating

    Radiant hydronic floor heat is a heating system that runs hot water through tubing that is embedded in an earthen floor or a poured concrete floor. The heat from a hydronic floor radiates up into the furniture and the feet of the occupants, so the room feels comfortable even at lower operating temperatures. This photo shows a coloured concrete floor being poured.

    In the book “Prescriptions For A Healthy House”, Paula Baker-Laporte, Erica Elliott, and John Banta recommend not using copper tubing, as was previously common, because it can conduct electromagnetic fields through the structure if it becomes charged anywhere along its route. Instead they list two types of odorless polyethylene tubing for use with hydronic floor heating systems.

    And combining hydronic heat with passive solar orientation makes the heating system for a house even more efficient, as the thermal mass in the earthen floor or concrete floor holds and re-radiates the heat over a longer period of time.

    Share
  • 12 August 2011

    Radiant Floor Heat Tubing

    Radiant Floor Heat Tubing

    Savings on utility bills and better indoor air quality are just two of the benefits of radiant floor heat systems. The heat from a radiant floor creates warmth that “radiates” into everything it touches – including furniture and your feet – making everything feel warm and cozy.

    The radiant heat tubing for this project was laid 9″ apart, which will accommodate several heat source systems, including a heat pump for geo thermal or a boiler (electric or gas). You can also use the water jacket on a wood stove to heat the water in the tubing. The other advantage to having the tubing a little closer together is that there are no pronounced hot or cold spots in the floor.

    One thing to consider is that where the tubing enters the floor directly from the heat source, the floor there will be a bit hotter, so it’s best to plan this for an area that you would want hot anyway, such as a living area or bathroom. Don’t have these tubes enter the floor near a cold storage area or pantry that you want to stay quite cool.

    Share
  • 4 August 2011

    Exterior Clay Slip

    Exterior Clay Slip

    After the baling was done, we shaped the walls using a large weed whacker for rough shaping and the Lancelot for fine detail shaping. Having the bale walls fairly smooth and plumb will make the plastering much easier later on.

    It’s possible to achieve beautiful finish plaster on top of undulating bale walls, but it is a lot more work and uses a lot more plaster, which involves extra labour and cost. No one wants that. It’s much better to take the time to even out rough spots on the wall at this stage.

    Next step was applying clay slip to the walls, which was done with a hopper and spray nozzle. You can see in the picture that Tim is using the Lancelot on a spot near the window buck, and the top half of the wall has already been sprayed with clay slip (a clay and water mixture).

    The sprayed clay slip penetrates into the bales and will provide the initial weather proofing for the bales until the plastering gets underway. From here, a rough plaster can be applied by hand and then a finish plaster.

    Or if the budget is very tight on a project, a rough plaster can be hard troweled to a relatively smooth finish without needing the finish plaster coat. Some people have commented that they love the look of the natural clay colour. However, if you go this route, you need to ensure that your roof overhangs are large enough to keep the rain and snow off of your rough plaster, as the finish plaster or lime render are designed to increase the ability of your walls to withstand extreme weather conditions. And of course, at any time, a lime render or a coloured finish plaster can be applied to the walls.

    Share